
Block storage in OpenStack: operator’s guide to Nova and Cinder
When starting with OpenStack, one of the most confusing aspects for new administrators is understanding how storage works for virtual machines. During our trainings, we consistently see participants struggle with a fundamental question: what’s the difference between storage provided by Nova and storage managed by Cinder?
This comprehensive guide addresses that confusion and goes far beyond the basics. You’ll learn the architectural differences between ephemeral and persistent storage, understand how to configure multiple storage backends (Ceph RBD, iSCSI arrays, local storage), create storage tiers using volume types, implement QoS policies to control performance, enable volume encryption with Barbican, manage snapshots and backups for data protection, perform volume operations including creation, attachment, extension, and migration between storage backends, and troubleshoot common storage issues using logs and diagnostic tools. We focus exclusively on block storage, the foundation of persistent data in cloud environments, deliberately omitting object storage (Swift) and file storage to provide clear, focused guidance for operators managing production OpenStack deployments.
Table of Contents
Nova block storage
When you launch an OpenStack instance, you automatically get ephemeral storage, local storage that exists only for the VM’s lifetime and is managed entirely by Nova. This storage comes in two forms. First, every instance has a boot disk (root disk) created from the instance flavor’s disk parameter. For example, a flavor with disk=40 creates a 40GB boot disk where the operating system is installed (e.g., /dev/vda). Second, flavors can optionally specify an ephemeral parameter, which creates an additional empty disk attached to the instance. For example, a flavor with disk=40 and ephemeral=20 gives the instance a 40GB boot disk at /dev/vda and a 20GB empty ephemeral disk at /dev/vdb for temporary data.
Disk size cannot be set independently from the flavor. If you want to keep the same number of vCPUs and RAM but increase disk size, you must create a new flavor that differs only in the disk parameter. There is no way to override the disk size when launching an instance without changing the entire flavor.
Many administrators confuse the boot disk with “ephemeral storage”. Both are ephemeral (temporary), but the ephemeral parameter specifically refers to the additional empty disk beyond the boot disk. All Nova-managed storage - both the boot disk and the additional ephemeral disk - is destroyed when you delete the instance. A rebuild operation also recreates both disks from scratch (the boot disk from a new image, the ephemeral disk as empty). However, data on both disks survives reboots and stop/start cycles. Additional ephemeral disks are used very rarely in practice. From this point forward, when we refer to ephemeral storage, we mean the root disk for instances.
Here’s an example of typical t-shirt size flavors showing the relationship between vCPUs, RAM, and disk size:
$ openstack flavor list
+--------------------------------------+-----------+-------+------+-----------+-------+-----------+
| ID                                   | Name      |   RAM | Disk | Ephemeral | VCPUs | Is Public |
+--------------------------------------+-----------+-------+------+-----------+-------+-----------+
| 7f3a8b2c-4e1d-4a9b-8c3f-1e2a3b4c5d6e | a1.small  |  2048 |   20 |         0 |     1 | True      |
| 9c2b1a3d-5f6e-4d8c-9a7b-2e3f4a5b6c7d | a1.medium |  4096 |   40 |         0 |     2 | True      |
| 4a5b6c7d-8e9f-4a1b-2c3d-4e5f6a7b8c9d | a1.large  |  8192 |   80 |         0 |     4 | True      |
| 1e2f3a4b-5c6d-7e8f-9a0b-1c2d3e4f5a6b | a1.xlarge | 16384 |  160 |         0 |     8 | True      |
+--------------------------------------+-----------+-------+------+-----------+-------+-----------+
In this example, each flavor follows a consistent ratio: 1 vCPU gets 2GB RAM, and each 1GB RAM gets 10GB of disk space. Notice that the Ephemeral column is 0 for all flavors, which is the typical configuration.
Nova storage backends
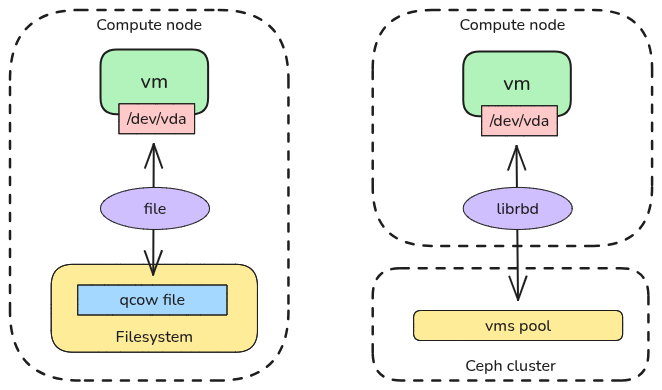
While Nova supports several storage backends (including LVM for high-performance bare-metal-like I/O), the two most common approaches in modern deployments are local file-based storage and Ceph RBD. The behavior of Nova storage is defined in the nova.conf file on compute nodes, specifically through the images_type parameter in the [libvirt] section. Each compute node can only use one storage backend for Nova ephemeral storage, you cannot mix different backends on the same compute node.
Nova storage backends - Local storage vs Ceph RBD
Local file-based storage
This is the default and simplest option. VM disks are stored as files on the compute node’s local filesystem (typically /var/lib/nova/instances/).
When launching an instance with QCOW2 format, Nova follows this process:
- Downloads the base image from Glance to a local cache (typically
/var/lib/nova/instances/_base/) if it doesn’t already exist on the compute node - Creates a copy-on-write (COW) backing file that references the base image
- The instance’s disk file only stores changes (delta) made to the image, saving massive amounts of space
For RAW format, there is no base image mechanism. Nova simply copies the entire image file for each instance, consuming more disk space but offering slightly better performance.
Configuration in nova.conf:
[libvirt]
images_type = qcow2
In the libvirt domain XML for QCOW2, the disk appears as a file-based device with a backing file:
<disk type='file' device='disk'>
  <driver name='qemu' type='qcow2' cache='none'/>
  <source file='/var/lib/nova/instances/instance-uuid/disk'/>
  <backingStore type='file'>
    <format type='qcow2'/>
    <source file='/var/lib/nova/instances/_base/base-image-hash'/>
  </backingStore>
  <target dev='vda' bus='virtio'/>
</disk>
The most important advantage of this approach is its simplicity of configuration, lack of external dependencies, and immediate availability after OpenStack installation. Using local files also has its limitations. If the compute node fails, ephemeral storage data may be lost, though recovery depends on whether the local disks remain accessible and intact. Live migration is significantly slower because the entire disk file must be copied over the network to the new host. Additionally, storage capacity is limited to the compute node’s local disks, and there is no access to enterprise features such as replication or snapshots.
Ceph RBD (networked block storage)
In production environments, it is highly recommended to use Ceph RBD (RADOS Block Device) for both Nova ephemeral storage and Cinder volumes. Here, Nova stores the ephemeral disks directly in a Ceph cluster. The disk is not a file on the compute node, it is an object in the Ceph storage cluster. When a VM starts, Ceph creates a clone of the image almost instantly.
Configuration in nova.conf:
[libvirt]
images_type = rbd
images_rbd_pool = vms
images_rbd_ceph_conf = /etc/ceph/ceph.conf
rbd_user = nova
In the libvirt domain XML, the disk appears as a network-based RBD device:
<disk type='network' device='disk'>
  <driver name='qemu' type='raw' cache='none' discard='unmap'/>
  <source protocol='rbd' name='vms/instance-uuid_disk'>
    <host name='mon1.rbd.company.acme' port='6789'/>
    <host name='mon2.rbd.company.acme' port='6789'/>
    <host name='mon3.rbd.company.acme' port='6789'/>
  </source>
  <auth username='nova'>
    <secret type='ceph' uuid='secret-uuid'/>
  </auth>
  <target dev='sda' bus='scsi'/>
  <address type='drive' controller='0' bus='0' target='0' unit='0'/>
</disk>
This approach enables fast live migration (only the memory state moves, the disk stays in Ceph), provides high availability via data replication, offers better performance than standard file-based storage, and provides a consistent storage platform when using Ceph for Cinder. The main requirement is a running Ceph cluster with proper network connectivity.
Image format for Ceph RBD
When using Ceph RBD for Nova ephemeral storage, the recommended image format in Glance is RAW, especially if Glance also uses the RBD driver for storing images. This provides significant performance and storage efficiency benefits. When a new instance is launched, instead of copying the entire image data within Ceph, the system creates a parent-child relationship. Ceph creates a copy-on-write (CoW) clone in the vms pool that references the base image as its parent. This means that creating instance disks, even for very large images, is nearly instantaneous because no data is actually copied. The instance volume only stores changes (delta) from the base image. This approach also uses significantly less space on the storage backend, as multiple instances can share the same base image data while maintaining their own independent changes.
Resizing ephemeral storage
Unlike Cinder volumes, which can sometimes be extended online, changing the size of Nova ephemeral storage is a disruptive action known as a resize. You must switch the instance to a new flavor with a larger disk attribute. OpenStack stops the instance, copies the disk data to a new location (often migrating to a different host), expands the disk image container, and reboots the instance. The guest OS (via cloud-init) then expands the filesystem to fill the new space. This is generally a one-way street: you can easily resize up to a larger flavor, but resizing down is rarely supported due to the risk of data corruption. Because the VM must be stopped and potentially moved, this operation involves downtime.
Cinder volumes
In contrast to Nova’s ephemeral storage, persistent storage provided by Cinder volumes exists independently of any instance. Cinder volumes live on dedicated storage backends (separate from compute nodes), are managed by Cinder service via standardized APIs, persist independently of instances, and can be attached, detached, and moved between instances. This provides scalable storage from specialized storage systems. You can create volumes before launching instances, attach volumes to running instances, detach volumes and attach them to different instances, delete instances while preserving volume data, and create snapshots and backups of volumes without stopping instances. This separation of compute and storage is fundamental to cloud architecture and enables critical capabilities like live migration, disaster recovery, and flexible workload management. Cinder provides persistent networked storage for production data that must survive instance failures, migrations, or deletions.
Unlike Nova where each compute node can only use one storage backend for ephemeral storage, Cinder supports multiple storage backends simultaneously on the same deployment. Each backend can expose different volume types (which we’ll discuss in detail later in this article), and a single instance can have multiple volumes attached from different volume types. When using boot-from-volume to launch an instance from a Cinder volume, the disk parameter in the flavor is ignored. The boot volume size is determined by the volume size you specify when creating it, making the boot disk size completely independent from other flavor parameters.
Cinder storage backends
Cinder supports a wide range of storage backends through its driver-based architecture [1]. While many drivers exist including NVMe-oF, Fibre Channel, NFS, and other mostly vendor-specific driver protocols, the two most popular approaches in production deployments are RBD (RADOS Block Device) and iSCSI-based drivers. According to the OpenStack User Survey [2], the Ceph RBD storage driver is used in over 50% of OpenStack installations.
If you don’t have external block storage devices but want to test how Cinder volumes work with iSCSI, you can enable the LVM backend in Cinder. This creates iSCSI targets from local LVM volumes on dedicated storage nodes. When using Kolla Ansible for deployment, you must first prepare the storage nodes by creating a physical volume (PV) and volume group (VG) named cinder-volumes on each node defined in the [storage] section of the inventory file. Then enable the LVM backend by setting enable_cinder_backend_lvm: "yes" in your globals.yml configuration. Kolla Ansible will automatically configure the iSCSI targets using the pre-created cinder-volumes volume group.
RBD driver (Ceph)
The RBD driver provides direct integration between OpenStack and Ceph storage clusters. When you attach a Cinder volume backed by Ceph RBD, Cinder communicates with the Ceph cluster via librbd library, the volume is exported as an RBD image from the Ceph cluster, and the compute node connects directly to the Ceph cluster using the RBD protocol. The volume appears as a block device in the VM (e.g., /dev/vdb) through the QEMU/librbd integration.

Cinder Ceph RBD storage backend
In the libvirt domain XML for boot-from-volume, a Cinder RBD volume appears very similar to Nova RBD storage, as from libvirt’s perspective the only differences are the pool name and the Ceph user:
<disk type='network' device='disk'>
  <driver name='qemu' type='raw' cache='none' discard='unmap'/>
  <source protocol='rbd' name='volumes/volume-uuid'>
    <host name='mon1.rbd.company.acme' port='6789'/>
    <host name='mon2.rbd.company.acme' port='6789'/>
    <host name='mon3.rbd.company.acme' port='6789'/>
  </source>
  <auth username='cinder'>
    <secret type='ceph' uuid='secret-uuid'/>
  </auth>
  <target dev='sda' bus='scsi'/>
  <address type='drive' controller='0' bus='0' target='0' unit='0'/>
</disk>
This approach offers direct RBD protocol integration which is more efficient than iSCSI overhead, native clustering where Ceph handles replication, distribution, and high availability, fast COW (copy-on-write) snapshots at the Ceph level, and thin provisioning where volumes consume space only as data is written. When using boot-from-volume with Ceph RBD backend, the CoW mechanism with Glance works exactly the same way as described earlier for Nova RBD storage, Ceph creates a parent-child relationship between the Glance image and the boot volume, making instance creation nearly instantaneous without copying data.
iSCSI-based drivers
Most enterprise storage vendors provide Cinder drivers based on the iSCSI protocol. These drivers work with storage arrays from NetApp, Dell EMC, HPE, Pure Storage, IBM, Huawei, and many others.

Cinder storage backend based on storage array
When you attach a Cinder volume backed by an iSCSI storage array:
- Cinder communicates with the storage array via vendor-specific API (REST, SSH, proprietary)
- The driver creates a volume/LUN on the storage array
- The storage array exports the volume via iSCSI target
- The compute node discovers and connects to the iSCSI target, which appears as a local block device on the compute node (e.g.,
/dev/sdb) - The block device is passed through to the VM via the appropriate libvirt driver, appearing as a block device inside the VM (e.g.,
/dev/sdbfor SCSI bus or/dev/vdbfor virtio bus)
On the compute node, you can see the iSCSI session and the attached block device:
# View active iSCSI sessions
$ iscsiadm -m session
tcp: [1] 192.168.100.10:3260,1 iqn.2010-10.org.openstack:volume-a1b2c3d4 (non-flash)

# Show session details including the device name
$ iscsiadm -m session -P 3 | grep -E "Target:|Attached scsi disk"
Target: iqn.2010-10.org.openstack:volume-a1b2c3d4 (non-flash)
                Attached scsi disk sdb          State: running

# List block devices
$ lsblk
NAME   MAJ:MIN RM  SIZE RO TYPE MOUNTPOINTS
sda      8:0    0  500G  0 disk
├─sda1   8:1    0  499G  0 part /
└─sda2   8:2    0    1G  0 part [SWAP]
sdb      8:16   0  100G  0 disk
Notice that sdb is the iSCSI-attached block device with no mount points, this device is passed directly to the VM and is not mounted on the compute node itself.
In the libvirt domain XML for boot-from-volume, an iSCSI volume appears as a local block device:
<disk type='block' device='disk'>
  <driver name='qemu' type='raw' cache='none' io='native' discard='unmap'/>
  <source dev='/dev/sdb'/>
  <target dev='sda' bus='scsi'/>
  <address type='drive' controller='0' bus='0' target='0' unit='0'/>
</disk>
Multipath support
iSCSI-based drivers support multipath I/O, which provides redundancy and load balancing by creating multiple network paths between the compute node and the storage array. If one path fails (due to network issues, switch failure, or redundant controller failure on the storage array), I/O automatically fails over to an alternative path without disrupting the VM. This significantly improves availability and can also increase throughput by distributing I/O across multiple paths. Enterprise storage solutions like NetApp MetroCluster take this further, enabling active-active data distribution across different geographical locations, providing disaster recovery capabilities while maintaining full read-write access from both sites simultaneously.
Multiple backends: creating storage tiers
One of Cinder’s most powerful features is multi-backend support. Many OpenStack clusters deploy multiple storage backends to diversify their offering for tenants. A standard tier might use Ceph HDD-based storage for general-purpose workloads, providing cost-effective capacity. A performance tier could leverage Ceph SSD or NVMe storage for I/O-intensive applications requiring low latency and high throughput. An enterprise tier might utilize commercial storage arrays for workloads demanding vendor support, where the array is replicated in active-active configuration across data centers for maximum availability.
A single physical storage cluster or array can expose multiple storage backends by presenting different physical disk groups with distinct characteristics. In Ceph, this might mean separate pools with different replication strategies (2-copy vs 3-copy replication) or pools based on erasure coding for capacity optimization. Similarly, a single Ceph cluster can have pools backed by different disk classes (HDD vs SSD vs NVMe) within the same infrastructure. For enterprise storage arrays, different storage backends might represent different disk shelves or RAID groups with varying performance profiles.
Users select these storage tiers via volume types, which map to specific backends. Beyond backend selection, the offering can be further subdivided within a single backend by creating artificial constraints on IOPS or bandwidth through different volume types. This allows a single physical backend to serve multiple service tiers, for example offering “standard-performance” and “limited-performance” volume types from the same Ceph pool, differentiated only by QoS policies.
Here is an example cinder.conf configuration showing a multi-backend deployment with two Ceph backends pointing to different pools on the same cluster and one NetApp iSCSI backend:
[DEFAULT]
enabled_backends = ceph-ssd,ceph-hdd,netapp-iscsi

[ceph-ssd]
volume_driver = cinder.volume.drivers.rbd.RBDDriver
volume_backend_name = ceph-ssd
rbd_pool = volumes-ssd
rbd_ceph_conf = /etc/ceph/ceph.conf
rbd_user = cinder
rbd_secret_uuid = a7f64266-2c5f-4d8e-b3e1-9c4f2e8a6b3d

[ceph-hdd]
volume_driver = cinder.volume.drivers.rbd.RBDDriver
volume_backend_name = ceph-hdd
rbd_pool = volumes-hdd
rbd_ceph_conf = /etc/ceph/ceph.conf
rbd_user = cinder
rbd_secret_uuid = a7f64266-2c5f-4d8e-b3e1-9c4f2e8a6b3d

[netapp-iscsi]
volume_driver = cinder.volume.drivers.netapp.common.NetAppDriver
volume_backend_name = netapp-iscsi
netapp_storage_family = ontap_cluster
netapp_storage_protocol = iscsi
netapp_server_hostname = 192.168.100.50
netapp_server_port = 443
netapp_login = cinder
netapp_password = ****
netapp_vserver = svm-cinder
In this configuration, both Ceph backends connect to the same Ceph cluster (using the same rbd_ceph_conf and rbd_secret_uuid) but utilize different storage pools. The volumes-ssd pool might be backed by SSD OSDs for high-performance workloads, while volumes-hdd uses HDD OSDs for cost-effective capacity. The NetApp backend provides an enterprise-grade option with vendor support and advanced features like active-active replication. Each backend is uniquely identified by its volume_backend_name, which is used when creating volume types that map to these backends.
Volume types
Understanding the relationship between storage backends and volume types is crucial for effective Cinder administration. Many administrators confuse these concepts, so let’s clarify the distinction.
Storage backend is the physical connection between Cinder and a storage system, configured in cinder.conf with specific driver settings and credentials. As shown in the previous configuration example, backends like ceph-ssd, ceph-hdd, and netapp-iscsi are defined at the infrastructure level and are invisible to end users.
Volume type is the logical, user-facing abstraction that:
- Maps to one specific storage backend
- Defines additional characteristics like QoS limits, encryption, or replication policies
- Provides a meaningful name that users can select when creating volumes
The relationship is: one storage backend can have multiple volume types, each offering different configurations of the same underlying storage.
Volume type visibility and access control
Volume types can be created with different visibility levels to control which projects can use them. A volume type can be public (available to all tenants), private (hidden from all projects by default), or selectively made available to specific projects. This allows administrators to offer premium storage tiers only to paying customers or restrict expensive enterprise storage to specific departments.
For example, you might create a public standard tier available to everyone, a private performance tier that you selectively grant to production projects, and a private enterprise tier reserved for critical workloads. Combined with Cinder’s granular quota system, this provides powerful resource governance. Quotas can be set per tenant as a total limit across all volume types (e.g., maximum 100 volumes or 10TB total storage), but can also be configured granularly per volume type. This means you could allow a tenant 50 standard HDD volumes but only 10 premium SSD volumes, or permit 5TB of standard storage but only 1TB of enterprise storage. This per-type quota granularity enables differentiated resource constraints based on storage tier, allowing precise control over expensive storage resources while maintaining generous limits for cost-effective tiers.
Practical example: one backend, multiple volume types
Imagine you have a single Ceph pool (volumes-ssd) connected as backend ceph-ssd from the previous configuration example. You can create multiple volume types from this single backend:
# Create three volume types, all using the same backend
openstack volume type create ssd-standard
openstack volume type set ssd-standard \
  --property volume_backend_name=ceph-ssd

openstack volume type create --private ssd-encrypted
openstack volume type set ssd-encrypted \
  --property volume_backend_name=ceph-ssd

openstack volume type create ssd-limited
openstack volume type set ssd-limited \
  --property volume_backend_name=ceph-ssd
All three types use the same physical storage backend (the ceph-ssd backend pointing to the volumes-ssd pool), but can offer different configurations for encryption, QoS limits, and other characteristics. We’ll explore these additional properties in detail in the following sections.
Volume encryption
Cinder supports volume encryption, which encrypts data at rest on the storage backend. This is essential for compliance requirements and sensitive workloads.
Volume encryption requires Barbican, OpenStack’s key management service. Without Barbican configured and running, volume encryption will not work. Barbican securely stores and manages encryption keys.
To enable encryption on a volume type:
# Create encrypted volume type
openstack volume type create encrypted-storage
openstack volume type set encrypted-storage \
  --property volume_backend_name=ceph-ssd \
  --encryption-provider luks \
  --encryption-cipher aes-xts-plain64 \
  --encryption-key-size 256 \
  --encryption-control-location front-end
When users create volumes with this type, Cinder automatically requests an encryption key from Barbican, creates an encrypted volume using dm-crypt/LUKS, and attaches the volume with transparent encryption/decryption on the compute node.
Encryption happens at the front-end (compute node level), which means the encryption overhead occurs on compute nodes (CPU cost) and data is encrypted before being sent to the storage backend. This approach works with any storage backend regardless of its underlying technology.
In the libvirt domain XML, an encrypted volume appears with additional encryption configuration:
<disk type='network' device='disk'>
  <driver name='qemu' type='raw' cache='none' discard='unmap'/>
  <source protocol='rbd' name='volumes/volume-uuid'>
    <host name='mon1.rbd.company.acme' port='6789'/>
    <host name='mon2.rbd.company.acme' port='6789'/>
    <host name='mon3.rbd.company.acme' port='6789'/>
  </source>
  <auth username='cinder'>
    <secret type='ceph' uuid='secret-uuid'/>
  </auth>
  <target dev='vdb' bus='virtio'/>
  <encryption format='luks'>
    <secret type='passphrase' uuid='encryption-secret-uuid'/>
  </encryption>
</disk>
The encryption happens transparently at the compute node level using the LUKS format, with the encryption key retrieved from Barbican and stored as a libvirt secret.
If you want to test volume encryption, you can enable Barbican when deploying OpenStack with Kolla Ansible by setting enable_barbican: "yes" in your globals.yml configuration file. For testing purposes, Kolla Ansible will configure Barbican with the simple_crypto backend, which stores secrets in the database (note that for production deployments, you should use a hardware security module or other secure backend).
When you encrypt volumes, the encrypted data appears random to the storage system, which has significant implications for storage efficiency. Deduplication doesn’t work because identical data blocks become different after encryption, preventing the storage system from recognizing duplicates. Compression is ineffective since encrypted data is incompressible, meaning storage systems cannot reduce its size. If your storage backend provides deduplication or compression features (like Ceph or enterprise arrays), encrypted volumes won’t benefit from these capabilities. For example, if your Ceph cluster normally achieves 2:1 compression on database volumes, encrypted volumes will consume the full uncompressed space. This can significantly increase storage costs. Choose encryption only when security requirements justify the storage efficiency trade-off.
Quality of Service (QoS)
QoS specifications allow administrators to control volume performance by setting limits or guarantees on IOPS (Input/Output Operations Per Second) and throughput (bandwidth). This is critical in multi-tenant environments to prevent resource exhaustion and ensure fair sharing.
Front-end vs. back-end QoS
Cinder supports two QoS enforcement locations, each with different characteristics:
Front-end QoS
Applied at the compute node level using QEMU’s I/O throttling capabilities. This approach works with any storage backend (Ceph, iSCSI, NFS, etc.) since enforcement happens at the compute layer. The compute overhead (CPU cycles used on compute nodes to enforce limits) is minimal but measurable. Limits apply instantly without requiring backend cooperation, and each attached volume can have different limits configured independently.
How it works:
- QoS limits are configured in Cinder
- When a volume is attached, Nova receives QoS parameters
- Nova configures QEMU to enforce limits on the virtual disk
- Limits are applied before I/O reaches the storage backend
Example front-end QoS specification:
openstack volume qos create frontend-limits \
  --consumer front-end \
  --property read_iops_sec=2000 \
  --property write_iops_sec=1500 \
  --property total_iops_sec=3000 \
  --property read_bytes_sec=209715200 \
  --property write_bytes_sec=104857600 \
  --property total_bytes_sec=314572800
In the libvirt domain XML, front-end QoS appears as an <iotune> block within the disk configuration:
<disk type='network' device='disk'>
  <driver name='qemu' type='raw' cache='none' discard='unmap'/>
  <source protocol='rbd' name='volumes/volume-uuid'>
    <host name='mon1.rbd.company.acme' port='6789'/>
    <host name='mon2.rbd.company.acme' port='6789'/>
    <host name='mon3.rbd.company.acme' port='6789'/>
  </source>
  <auth username='cinder'>
    <secret type='ceph' uuid='secret-uuid'/>
  </auth>
  <target dev='vdb' bus='virtio'/>
  <iotune>
    <read_iops_sec>2000</read_iops_sec>
    <write_iops_sec>1500</write_iops_sec>
    <total_iops_sec>3000</total_iops_sec>
    <read_bytes_sec>209715200</read_bytes_sec>
    <write_bytes_sec>104857600</write_bytes_sec>
    <total_bytes_sec>314572800</total_bytes_sec>
  </iotune>
</disk>
The <iotune> configuration is applied by QEMU at the hypervisor level, throttling I/O operations before they reach the storage backend. This ensures consistent performance limits regardless of the underlying storage technology.
Note: Similar QoS capabilities can be configured for Nova ephemeral storage using flavor extra specs. QoS for Nova block storage can only be set at the libvirt level (equivalent to Cinder front-end QoS) by defining metadata parameters like quota:disk_read_bytes_sec in the flavor definition [3]. This allows you to apply I/O limits to ephemeral disks in the same way front-end QoS limits Cinder volumes.
Back-end QoS
Applied at the storage backend level by the storage system itself. This approach requires storage backend support (not all backends support QoS), with compatibility limited to specific systems like Ceph RBD or some enterprise arrays. Since enforcement happens on the storage system rather than compute nodes, there is no compute overhead. Storage-level enforcement provides more precise control for shared storage scenarios where multiple instances access the same backend.
How it works:
- QoS specs are configured in Cinder
- Cinder driver communicates QoS parameters to the storage backend
- Storage system enforces limits at the storage layer
- Limits are applied before data is written/read from disks
Example back-end QoS for NetApp ONTAP:
openstack volume qos create netapp-performance-limit \
  --consumer back-end \
  --property maxIOPS=10000 \
  --property maxBPS=524288000    # 500 MB/s throughput
NetApp ONTAP enforces QoS through policy groups at the storage controller level. When you create a volume with this QoS spec, the Cinder NetApp driver automatically creates a corresponding QoS policy group on the NetApp storage system and associates it with the volume. The storage controller then enforces these limits directly on the storage backend, independent of compute node resources.
The specific QoS parameters available for back-end QoS (like maxIOPS and maxBPS for NetApp) are defined by each storage driver and documented in the driver-specific documentation. Different storage backends support different parameter names and capabilities, so always consult the documentation for your specific Cinder driver to determine which QoS properties are supported.
Associating QoS with volume types
QoS specs are linked to volume types, not individual volumes. Let’s continue with our previous examples and associate the front-end QoS spec we created earlier with the ssd-limited volume type from the ceph-ssd backend:
# Associate the front-end QoS spec with the volume type
openstack volume qos associate frontend-limits ssd-limited

# Now all volumes created with 'ssd-limited' type inherit these limits
openstack volume create --size 100 --type ssd-limited my-limited-volume
OpenStack always has one volume type configured as the default. When you create a volume without specifying --type, Cinder uses this default type. The default volume type is configured in cinder.conf using the default_volume_type parameter in the [DEFAULT] section. This is particularly important when launching instances through Horizon: when you check “Create New Volume” in the instance creation wizard, Horizon automatically uses the default volume type without prompting you to select one. This means the default volume type defines the storage characteristics for boot-from-volume instances created through the GUI unless explicitly overridden.
Snapshots and backups
Cinder provides two mechanisms for protecting volume data: snapshots and backups. Understanding the difference is important for data safety. Both operations can be performed without stopping the instance, volumes can be snapshotted or backed up while attached to running VMs.
Volume snapshots
Snapshots create point-in-time copies of volumes, useful for quick rollback before risky operations or creating volume templates.
# Create snapshot
openstack volume snapshot create --volume my-volume pre-upgrade-snapshot

# Create new volume from snapshot
openstack volume create --snapshot pre-upgrade-snapshot restored-volume

# Delete snapshot
openstack volume snapshot delete pre-upgrade-snapshot
Snapshot implementation depends on the storage backend. Ceph RBD uses COW (copy-on-write) at the RBD level, while iSCSI arrays use backend-specific vendor snapshot mechanisms. The snapshot always resides on the same storage backend as the original volume.
Since snapshots are handled by backend mechanisms, only data that has been written to the storage backend is captured. There is a risk that data remains in cache layers, particularly the filesystem cache in the guest OS memory (page cache) or application buffers that haven’t been flushed to disk yet. To ensure a consistent snapshot that includes all data, you need to enable the QEMU guest agent in the VM and configure image metadata to enable quiescing.
When you enable quiescing, the snapshot process works as follows:
- Cinder instructs Nova to create a snapshot
- Nova communicates with the QEMU guest agent running inside the VM
- The guest agent triggers a filesystem freeze operation (using
fsfreezeon Linux) - The filesystem flushes all pending writes from cache to disk and temporarily suspends write operations
- The storage backend creates the snapshot with all data consistently written
- The guest agent unfreezes the filesystem
- Normal I/O operations resume
To enable quiesced snapshots, you need two components. First, the QEMU guest agent must be installed inside the VM (qemu-guest-agent package on most distributions). Second, you must configure two image metadata properties on the Glance image. The best practice is to set these properties on the base image, so all instances launched from that image automatically have quiesced snapshots enabled:
openstack image set --property hw_qemu_guest_agent=yes \
  --property os_require_quiesce=yes \
  my-ubuntu-image
With both properties configured on the image, all instances launched from this image will automatically have quiesced snapshots enabled. The hw_qemu_guest_agent property enables the communication channel between Nova and the guest agent, while os_require_quiesce instructs Cinder to use that channel for consistent snapshots.
Snapshots are not true backups, they live on the same storage system as the source volume. If the backend fails, both volume and snapshots are lost.
Volume backups
Backups copy volume data to a separate storage repository as independent objects:
# Create backup
openstack volume backup create --name db-backup my-database-volume

# Restore from backup
openstack volume create --backup db-backup restored-volume
Cinder backup service stores volume data as objects using backup drivers that are separate from volume storage backend drivers. The backup driver ecosystem includes support for Swift, Ceph RBD, NFS, S3-compatible storage, and other object storage systems [4]. It’s important to understand that Cinder backup operates at the volume level, backing up only the data from individual volumes. It does not create a complete VM backup with all VM properties like multiple attached volumes, network interfaces, instance flavor, metadata, or security groups. If you need full VM-level backups that can be restored as a complete, ready-to-launch instance, you need a third-party backup solution. Cinder backup focuses exclusively on protecting volume data.
Configure backups to use a different storage infrastructure than your production volumes. For example, if volumes are stored on Ceph cluster A in datacenter 1, store backups in Ceph cluster B in datacenter 2 or on an entirely different storage system like S3-compatible object storage. This protects against cluster-level and datacenter-level failures, ensuring that your backup data survives even if the entire production storage cluster becomes unavailable.
Volume operations
Beyond understanding storage architecture and volume types, operators need to master day-to-day volume operations. This section covers the most common operations you’ll perform when managing Cinder volumes in production.
Creating volumes
The most basic operation is creating an empty volume with a specific size and volume type:
# Create a 100GB volume with specific volume type
openstack volume create --size 100 --type ssd-limited my-limited-volume
When you create a volume without specifying --type, OpenStack uses the default volume type configured in cinder.conf via the default_volume_type parameter in the [DEFAULT] section. This default type determines which storage backend and characteristics (QoS, encryption) the volume will have. Understanding your default volume type is critical because it’s automatically used when creating volumes through Horizon’s “Create New Volume” button or when launching boot-from-volume instances without explicitly selecting a type.
Creating bootable volumes from images
To create a bootable volume from a Glance image, use the --image parameter:
# Create bootable volume from Ubuntu image
openstack volume create --size 40 \
  --type ssd-standard \
  --image ubuntu-22.04 \
  ubuntu-boot-volume
This creates a volume with the image contents copied to it, making it ready to boot instances. The volume size must be at least as large as the image size.
Creating volumes from snapshots and backups
You can also create volumes from existing snapshots or backups:
# Create volume from snapshot
openstack volume create --snapshot pre-upgrade-snapshot restored-volume

# Create volume from backup
openstack volume create --backup db-backup restored-db-volume
Volumes created from snapshots inherit the same volume type as the original volume, while volumes from backups can use any volume type you specify.
Attaching volumes to instances
Once you have a volume, you can attach it to a running instance:
# Attach volume to running instance
openstack server add volume my-instance my-data-volume

# Verify attachment
openstack volume show my-data-volume -c status -c attachments
The volume appears as a new block device inside the instance (typically /dev/vdb, /dev/vdc, etc.). You need to partition, format, and mount it before use:
# Inside the instance
sudo mkfs.ext4 /dev/vdb
sudo mkdir /mnt/data
sudo mount /dev/vdb /mnt/data
To detach a volume, first unmount it inside the instance, then detach from OpenStack:
# Inside the instance
sudo umount /mnt/data

# From OpenStack CLI
openstack server remove volume my-instance my-data-volume
Launching instances from bootable volumes
For boot-from-volume instances, use the --volume parameter when creating the instance:
# Launch instance from existing bootable volume
openstack server create \
  --flavor a1.medium \
  --network private-network \
  --volume ubuntu-boot-volume \
  my-instance

# Or create a bootable volume and instance in one command
# This uses the default volume type
openstack server create \
  --flavor a1.medium \
  --network private-network \
  --boot-from-volume 40 \
  --image ubuntu-22.04 \
  my-instance
The --boot-from-volume parameter creates a new bootable volume of the specified size from the image and boots from it. This command uses the default volume type configured in Cinder. When using boot-from-volume, the flavor’s disk parameter is completely ignored, the boot disk size comes from the volume size.
Extending volume size
Unlike Nova ephemeral storage, Cinder volumes can be extended to a larger size without recreating the volume or migrating to a different host. This is one of Cinder’s key advantages:
# Extend volume from 100GB to 200GB
openstack volume set --size 200 my-data-volume
The extension happens at the storage backend level. For Ceph RBD, the RBD image is resized. For iSCSI arrays, the LUN is expanded. After extending the volume at the backend level, the Linux kernel detects the new size. You can verify this by checking the kernel messages:
# Check kernel messages for block device size change
sudo dmesg | tail
# Example output:
# [12345.678901] vdb: detected capacity change from 107374182400 to 214748364800
The kernel message confirms that the block device size has changed from the old capacity to the new capacity. After the kernel recognizes the new size, you need to extend the filesystem inside the instance:
# For ext4 filesystem (volume still mounted)
sudo resize2fs /dev/vdb

# For XFS filesystem (volume still mounted)
sudo xfs_growfs /mnt/data
This operation can be performed while the volume is attached to a running instance, providing online volume expansion without downtime. You can only extend volumes to a larger size; shrinking volumes is not supported due to the risk of data loss.
Volume migration (retype)
Volume migration, often called volume “retype”, allows you to move a volume between different storage backends or change its volume type. This is fundamentally different from extending volume size.
# Migrate volume to different volume type (and potentially different backend)
openstack volume set --type ssd-standard --retype-policy on-demand my-volume
There are two migration policies that determine when the migration happens:
On-demand migration (--retype-policy on-demand)
With this policy, Cinder creates a new volume on the target backend, copies all data, and replaces the original volume. The migration can be performed while the volume is attached to a running instance.
When the volume is in use, Cinder doesn’t copy data directly - it goes through Nova and libvirt, which use QEMU’s block mirror mechanism. Here’s how it works:
- Cinder creates a new empty volume on the target backend (e.g., an iSCSI LUN on a storage array) and connects it to the compute node as a second block device
- Cinder tells Nova to start a block job on the instance via libvirt, which sends a
blockdev-mirrorcommand to QEMU over the QMP (QEMU Machine Protocol) socket - QEMU starts copying sectors from the source to the destination while the instance keeps running normally against the original volume. Any block written by the guest during this copy is tracked in a dirty bitmap - those blocks get re-copied at the end, so no write is lost
- After the initial copy, QEMU does a final pass to sync the remaining dirty blocks
- QEMU performs an atomic pivot (
block-job-complete) - it swaps the block device pointer from source to destination in a single operation - Cinder detaches the original volume from the compute node and updates its database to reflect the new backend
The guest kernel never sees a device disappear - the dirty bitmap guarantees write consistency throughout the copy, and the pivot itself completes in milliseconds. The only observable effect is a brief I/O latency spike during the final dirty-block sync before the cutover.
# Migrate to enterprise storage (volume can remain attached)
openstack volume set --type netapp-enterprise --retype-policy on-demand my-volume

# Wait for migration to complete
openstack volume show my-volume -c status -c migration_status
Never migration (--retype-policy never) - default
This is the default policy. It only changes the volume type metadata without moving data between backends. It only works when changing between volume types that map to the same storage backend and have compatible configurations. This is useful for changing QoS limits without data movement, for example changing from ssd-standard to ssd-limited where both use the same ceph-ssd backend but have different QoS policies:
# Change QoS policy without data migration (same backend)
openstack volume set --type ssd-limited --retype-policy never my-volume
Use on-demand migration when moving between different storage backends or when the volume types have incompatible configurations (e.g., different backends or changing encryption settings). Use never when you only want to change QoS policies on the same backend without data movement.
Downloading volumes via Glance
Cinder volumes cannot be downloaded directly to your local machine. Instead, you must first upload the volume to Glance as an image, then download the image:
# Upload volume to Glance as image
openstack image create --volume my-volume my-volume-image

# Wait for upload to complete
openstack image show my-volume-image -c status

# Download the image
openstack image save --file my-volume.raw my-volume-image
This creates a Glance image containing the volume’s data, which you can then download. The downloaded file format depends on the Glance image format (typically RAW or QCOW2). This is useful for creating backup copies outside of OpenStack or transferring volumes to other clouds.
Volume transfer between projects
Volume transfer is one of the few mechanisms in OpenStack that allows transferring resources between projects (tenants). This is useful when reorganizing projects or transferring volumes to different teams.
The transfer process uses a transfer request with an authentication key:
# In the source project: create transfer request
openstack volume transfer request create my-volume

# Output includes transfer ID and auth_key:
# +------------+--------------------------------------+
# | Field      | Value                                |
# +------------+--------------------------------------+
# | auth_key   | a1b2c3d4e5f6                        |
# | created_at | 2025-12-27T10:30:00.000000          |
# | id         | 7f8e9d0c-1b2a-3c4d-5e6f-7a8b9c0d1e2f |
# | name       | my-volume                            |
# +------------+--------------------------------------+

# In the destination project: accept transfer
openstack volume transfer request accept \
  --auth-key a1b2c3d4e5f6 \
  7f8e9d0c-1b2a-3c4d-5e6f-7a8b9c0d1e2f
After accepting the transfer, the volume disappears from the source project and appears in the destination project, retaining all its data and characteristics (volume type, size, snapshots). The volume must be detached before initiating a transfer. This mechanism provides a secure way to transfer volumes without requiring administrator intervention, as only someone with both the transfer ID and auth key can accept the transfer.
Block storage troubleshooting
When troubleshooting block storage issues in OpenStack, understanding where to find relevant logs and how to inspect the actual storage configuration is essential for quickly identifying and resolving problems.
Finding storage logs
For Nova ephemeral storage, all storage backend communication happens on compute nodes through the nova-compute service. Storage-related logs are located in /var/log/nova/nova-compute.log on the compute node where the instance is running. The Nova storage drivers log detailed information about image downloads, CoW operations, RBD communications, and any errors encountered during disk creation or attachment. When troubleshooting ephemeral storage issues, always check the compute node logs rather than controller logs.
For Cinder volumes, the critical logs are in the cinder-volume service, typically found at /var/log/cinder/cinder-volume.log on the node running the cinder-volume service. Each storage driver logs detailed information about every operation it performs with the storage backend, including volume creation, attachment, deletion, snapshot operations, and backend API communications. When debugging volume issues, these logs show the exact commands sent to the storage array or Ceph cluster and any errors returned.
For Cinder backups, remember that backup operations use separate drivers from volume storage backend drivers. Backup logs are found in the cinder-backup service logs at /var/log/cinder/cinder-backup.log. This separation means backup-related issues require checking different logs than volume operations, even though both involve Cinder.
Enabling debug logging provides significantly more detailed information about driver communication and can be invaluable when troubleshooting complex storage issues. To enable debug mode, set debug = True in the [DEFAULT] section of the relevant configuration file (nova.conf for Nova, cinder.conf for Cinder) and restart the service. Debug logs include detailed API calls, driver responses, and intermediate steps that are not visible in normal log levels.
Inspecting libvirt storage configuration
To see the actual storage configuration for a running instance, use virsh commands to dump the libvirt domain XML. First, identify the instance name on the compute node:
# List all running instances
virsh list

# Dump the complete XML configuration for an instance
virsh dumpxml instance-00000123 > /tmp/instance-config.xml
The dumped XML shows the exact storage configuration including disk types (file, block, network), backend protocols (RBD, iSCSI), QoS settings in <iotune> blocks, encryption configuration, and Ceph authentication details. This is particularly useful for verifying that volume types, QoS policies, and encryption settings are correctly applied to the instance.
Other useful virsh commands for block storage troubleshooting include:
# Show detailed block device information for an instance
virsh domblkinfo instance-00000123 vda

# Monitor real-time block I/O statistics
virsh domblkstat instance-00000123 vda --human

# List all block devices attached to an instance
virsh domblklist instance-00000123

# Show live storage performance statistics
virsh domstats instance-00000123
Filesystem corruption and repair
Filesystem corruption can occur due to unexpected instance crashes, storage backend failures, or improper shutdown procedures. When filesystem corruption prevents an instance from booting, you have several options for running fsck to repair the filesystem.
The recommended approach is using Nova’s rescue mode, which boots the instance from a rescue image and attaches the corrupted disk as a secondary device. This allows you to safely run fsck without mounting the corrupted filesystem:
# Put instance into rescue mode
openstack server rescue my-instance

# SSH into the rescue instance and run fsck
ssh ubuntu@rescue-instance-ip
sudo fsck -f /dev/vdb1

# Exit rescue mode when done
openstack server unrescue my-instance
Alternatively, you can mount and repair the filesystem directly on the compute node, but the approach differs depending on the storage backend. For Nova local file-based storage with QCOW2 images, use qemu-nbd (Network Block Device) to expose the QCOW2 file as a block device:
# Load the nbd kernel module if not already loaded
modprobe nbd max_part=8

# Connect the QCOW2 image to an NBD device
qemu-nbd --connect=/dev/nbd0 /var/lib/nova/instances/instance-uuid/disk

# List partitions
fdisk -l /dev/nbd0

# Run fsck on the partition
fsck -f /dev/nbd0p1

# Disconnect when done
qemu-nbd --disconnect /dev/nbd0
For Cinder volumes with iSCSI backends, the block device is directly available on the compute node while attached, making repair straightforward. First, ensure the instance is stopped to prevent filesystem conflicts:
# Verify the iSCSI device is present
iscsiadm -m session
lsblk

# The volume appears as /dev/sdX - run fsck directly
fsck -f /dev/sdb1
For Ceph RBD backends (both Nova and Cinder), you can map the RBD image directly on any node with Ceph access:
# Map the RBD image to a local block device
rbd map volumes/volume-uuid --name client.cinder

# The image appears as /dev/rbdX
ls -l /dev/rbd*

# Run fsck
fsck -f /dev/rbd0p1

# Unmap when done
rbd unmap /dev/rbd0
Conclusion
OpenStack block storage comes from two services with distinct purposes: Nova provides ephemeral storage tied to instance lifecycle, while Cinder delivers persistent volumes with multi-backend support and sophisticated storage tiers through volume types. The critical architectural pattern is the distinction between storage backends (physical infrastructure connections in cinder.conf) and volume types (user-facing abstractions that map to backends and layer features like encryption, QoS, or access controls). Understanding snapshots versus backups, enabling crash-consistent snapshots with QEMU guest agent, and knowing where to find logs (nova-compute, cinder-volume, cinder-backup) forms the operational foundation for managing block storage in production.
This guide provides a foundation for understanding and operating OpenStack block storage, but the ecosystem contains numerous advanced topics beyond this article’s scope. Block device mappings and the intricacies of volume attachment mechanisms [5] deserve dedicated exploration for understanding how Nova orchestrates storage connections. Image format choices (RAW vs QCOW2) have profound implications for storage efficiency, snapshot capabilities, and performance characteristics. Virtualization drivers present critical trade-offs: virtio-blk offers simplicity and performance while virtio-scsi provides SCSI command support and better scalability for many attached volumes. Volume encryption merits deeper investigation into key rotation, encrypted volume migration, and performance considerations. The interaction between Glance and Cinder extends beyond basic image-to-volume operations to include Glance image caching on Cinder backends and using Cinder volumes as Glance storage backends. Production deployments require multipath configuration for iSCSI reliability and performance. Advanced storage protocols like NVMe-oF and Fibre Channel bring their own configuration patterns and performance characteristics. Cinder consistency groups and generic volume groups enable coordinated snapshot operations across multiple volumes for application-consistent backups. Cinder scheduler filters control volume placement decisions across backends. Enterprise backup and disaster recovery strategies demand integration with specialized backup solutions beyond basic Cinder backup capabilities. Each of these topics could fill a dedicated article, reflecting the depth and sophistication of OpenStack’s block storage architecture.
[1] For a complete list of supported Cinder drivers, see the OpenStack Cinder Driver Support Matrix.
[2] See deployment statistics in the OpenStack User Survey Analytics under Deployment Decisions.
[3] For Nova ephemeral storage QoS configuration, see Nova Extra Specs - Quota disk I/O.
[4] For a complete list of Cinder backup drivers, see OpenStack Cinder Backup Drivers.
[5] For a detailed exploration of block device mappings and volume attachment mechanisms in OpenStack, see Jamie Lennox’s article Block Devices in OpenStack.
Block storage configuration is covered in our OpenStack training courses. If you need help with storage backend selection, Cinder configuration, or Ceph integration in your OpenStack environment, our OpenStack consulting services can help. We also provide training and consulting services in Polish.